You may have noticed over the past week that there is a new addition on the blog!
Now, whenever you hover your mouse over a picture in a Wifessionals' post, a Pinterest button appears.
I tried many different "Pin It" options for the blog, but this was, by far, my favorite. It's clean looking and only appears when you hover. That means there aren't 1,000 "Pin It" buttons everywhere.
A lot of you emailed me when you noticed the change, asking me to explain how I did this.You ask, I answer!
The Button
Go to your Blogger dashboard and click Template - - - > Edit HTML - - - > ProceedCTRL + F or Command + F to find

near the end of your template.
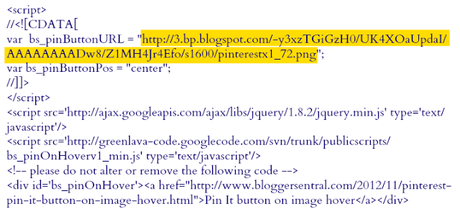
Paste this code above
 <script>//</script><script src="http://ajax.googleapis.com/ajax/libs/jquery/1.8.2/jquery.min.js" type="text/javascript"><script src="http://greenlava-code.googlecode.com/svn/trunk/publicscripts/bs_pinOnHoverv1_min.js" type="text/javascript"><div id="bs_pinOnHover"><a href="http://www.bloggersentral.com/2012/11/pinterest-pin-it-button-on-image-hover.html">Pin It button on image hover</a></div><br />
It looks like this:

Click "Save Template" & "Close".Go look at your blog!!!
Now if you want to be a fancy pants like me, you can change the button to any image you want!Most likely you will want to stick with the Pinterest "P", but maybe you want to change the color like I did?
Here's how!
Customize Your Button:
Save this image to your computer.

Go to PicMonkey.com and upload a blank swatch of the background you want to use. I chose:

Once you upload it, crop it into a perfect square. Then select "Frames" and "Rounded Corners".Slide the "Corner Radius" knob all the way to the right & click "Transparent Corners".This should give you a perfect circle.Go to "Basic Edits" and click "Resize".Make sure "Keep Proportions" is checked and changed the dimensions to 75 x 75.Go to "Overlays" & click "Your Own".Upload the "P" that you saved above.Use the colorpicker to choose what you would like your "P" to look like.Move and resize your "P" until you are satisfied, and then save the image as a .png on your computer.
Here is what mine looks like:
Once you save it, upload it to the photosharing website you use.Get the direct link and go paste it in place of the yellow highlighted code above.Make sure you leave the quotation marks before and after!!!!
Save your HTML template and enjoy!!!
"Change can change your life. You'll never know unless you embrace it."
Check out more from my biffle's life:

 near the end of your template.


